Your cart is currently empty!

I Turned My Child’s 20-year-old Tape Recording Story Into a Children’s Book and Video
Twenty years ago, I had an idea to ask my daughter to make up a short story while I recorded it. I make music in a home recording studio, so after recording the story, I set it to music and put it on a website to share with family and friends.
Yes, I’m that guy.
Fast-forward twenty years and it’s my daughter’s 30th birthday and I was thinking about giving her something special and thought of that now-dormant story recording: what if I turned that into a children’s book with awesome illustrations?
So that’s what I did and here’s the story behind that. (It was very easy!)
Hiring an Illustrator
I’ve used Fiverr.com in past for both work and personal service requests, including the Yellow Cartoon project I write about here. My experiences with the whole Fiverr process has mostly been good. I would stay away from using it for logo design and really anything you for which you want the results to be completely unique and personal.
I was looking for a style that fit the mood of my daughter’s story and as I browsed Fiverr for children’s book illustrators, I did notice that most have a certain style and their illustrations are not entirely unique from project to project; they often re-use elements and even characters — at least partially.
I chose Uliana Barabash, a Ukranian illustrator, for my children’s book project.
Submitting an Illustration Request
Here is my request:
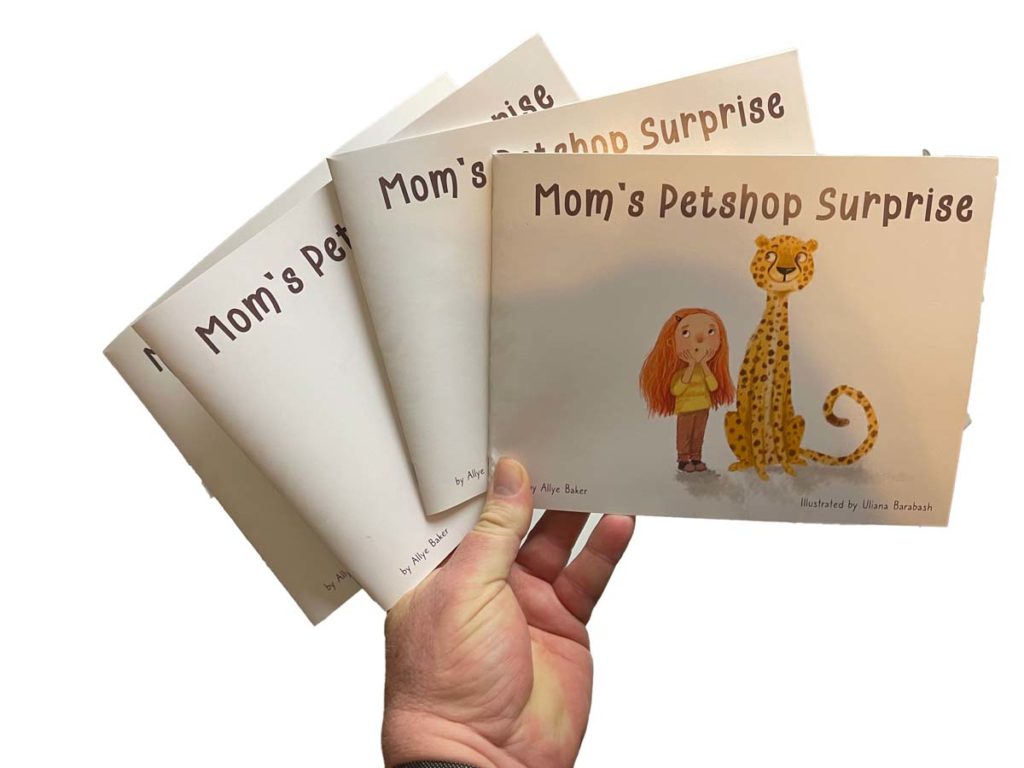
Mom’s Petshop Surprise
by Allye Baker, age 7.Characters:
Allye: 7-year-old girl with red hair, brown eyes, fair skin
Pet store owner: friendly man working at pet store
Cheetah: a red-eye cheetah
Mom: blonde hair, green eyes mid-thirtiesPage 1
Once upon a time there was a girl named Allye.
She wanted to go get a baby animal.Page 2
When Allye went to the pet store, the animals were all gone.Page 3
So she went to the guy who you pay who said, “I have one more pet.”
It was a baby cheetah!
It was a red eye cheetah. And the best part, it was a baby!Page 4
So Allye went home and after she fed it 10 bottles, the cheetah was a teenager.Page 5
The next day Allye gave hime one bottle and her cheetah was all grown up.Page 6
Allye’s mom came so she had to hide the cheetah.
Allye put a blanket on him.Page 7
Allye’s mom came upstairs in the bathroom —Page 8
Allye was too late.
Her mom saw the cheetah.
Allye’s mom said, “A cheetah!” and laughed.Page 9
“What’s so funny?”asked Alley.Page 10
“I’ve always wanted a cheetah.”
The end.COVER
An illustration that summarizes and captures the idea and feeling of the story.
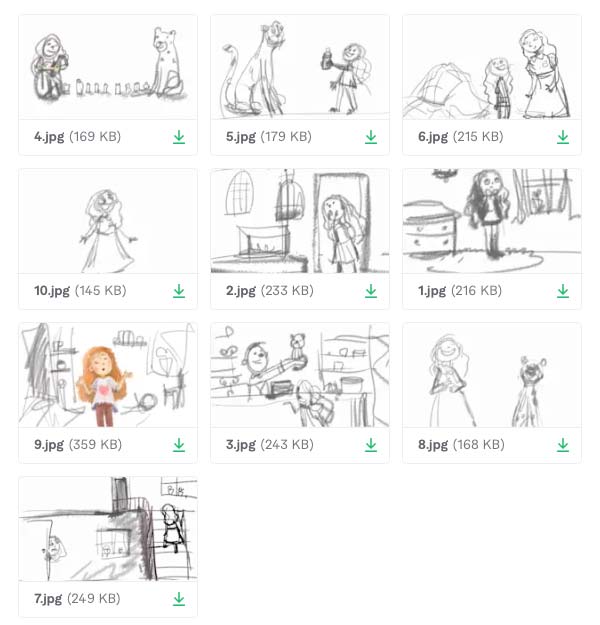
As you can see, there were a number of illustrations needed to complete a full children’s book, including the cover; but in about a week, Uliana had sketched out the framework of each page and sent them along to me to approve.
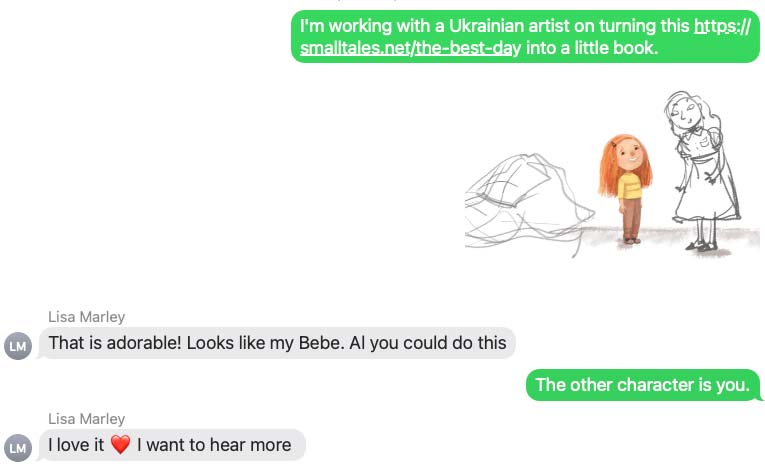
Communications From the Illustrator
Communicating With Your “Team”
I shared the process with my daughter, Allye, and her mom, Lisa, who is the other main character in the book. Allye illustrates some wonderful characters herself so I wanted her to see how something like this comes together and maybe become excited about it and do some of her own.
Making the Book
Fortunately I manage a couple printshops so making a book is right in my comfort zone. It’s doubly fortunate that we added a new digital printer that has a booklet maker attachment with beautiful color capabilities. Producing saddle-stitched books is a real dream these days.
Designing the Book Layout
The first consideration when designing the layout of a book is how it will be bound. The standard options are:
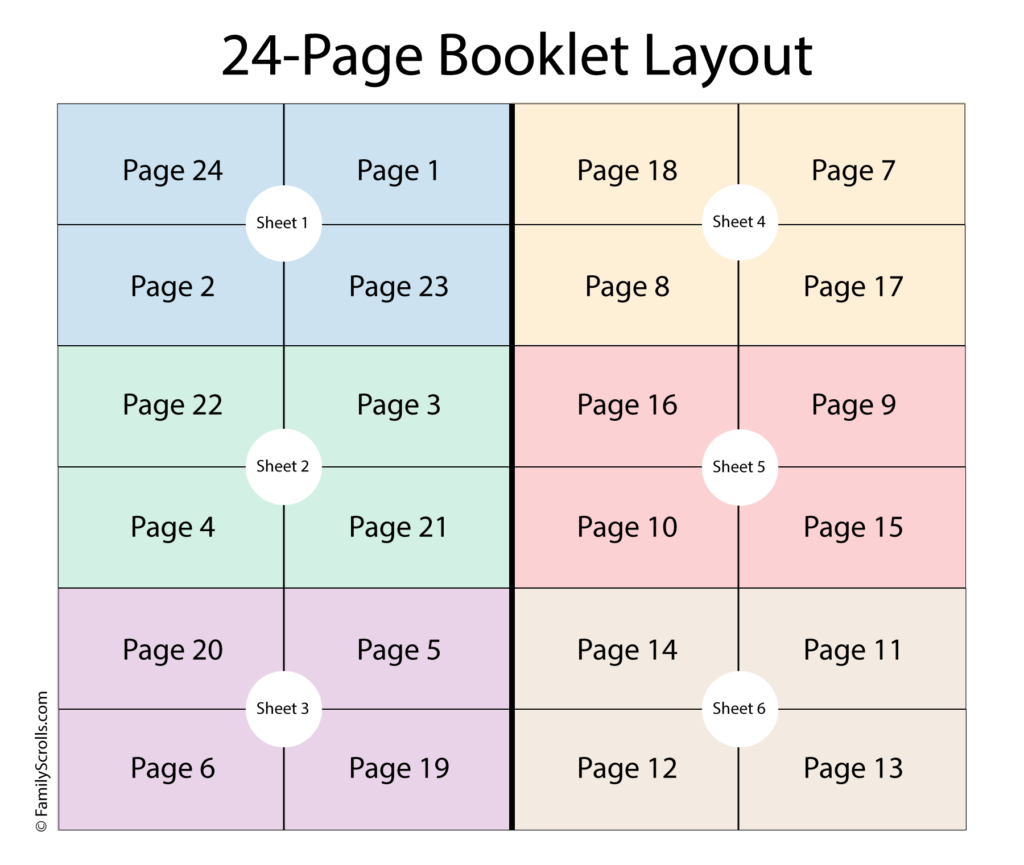
Saddle-stiched
These books are bound like a zine or booklet, folded in half with two staples in the middle along the fold. For saddle-stitched books you will have four pages per sheet since each sheet is printed on both sides and folded in half you have two pages on each side of each sheet.
A 24-page book will consist of six sheets of paper or spreads (in printshop-speak). The page layout looks like this:
Watch for a detailed step-by-step guide on how to set up saddle-stitched booklets in Adobe InDesign (the software of choice for professional layout) for printing at your local printshop.
The layout above is in “printer spreads,” so named because this is set up for printing. The first sheet is printed and then flipped over in the machine to print the second side, and so on. Once a complete book is printed it’s fed into the finishing section where it’s saddle-stitched.
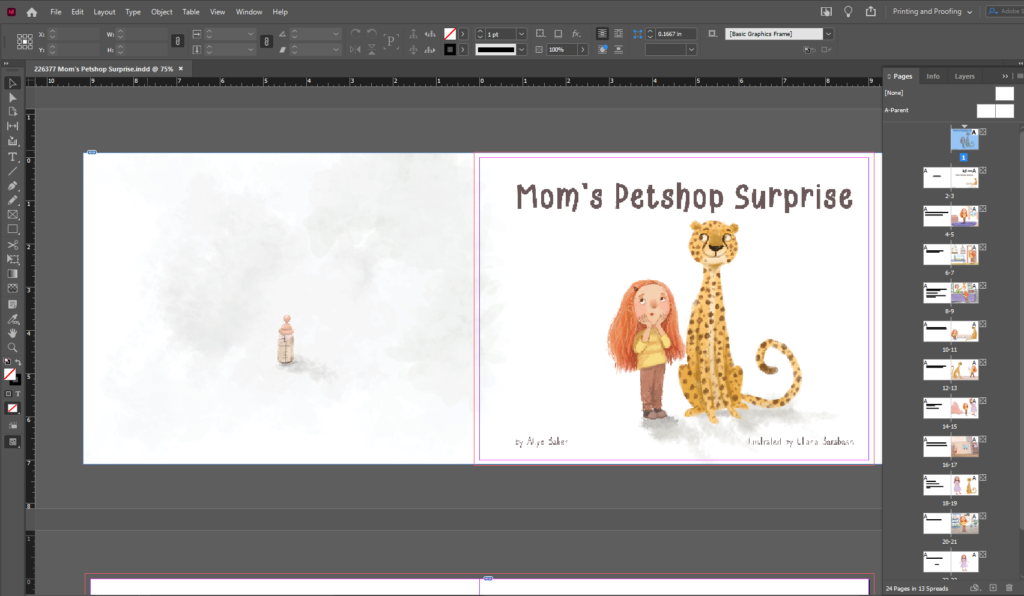
Professional software will do some of the work for you, however, so you don’t need to set it up this way. In InDesign, you can set up each individual page on its own InDesign page and set the view to “Facing Pages” so when you scroll through the pages it looks as it reads. This is called “reader spreads.”
Here’s what the layout looks like in InDesign’s Pages panel:
Perfect
Tags:
Comments
Family Scrolls is dedicated to creating living, rich media histories. My name is Briyan Baker and I’ve always loved exploring my family history. My career in the graphic arts industry has allowed me to explore all kinds of creative uses for multimedia materials: audio, video, text, photos, graphics, etc., and bring them to life while telling vivid, engaging stories.
- Blog (1)
- Books, Journals, Historical Writing (7)
- Crafting and Keepsakes (5)
- Family Events (2)
- Genealogy (3)
- Oral History (2)
- Photo, Audio, Video (4)
- Print and Display Ideas (4)
- Vlogging (3)
- World Wide Web Family (4)
Leave a Reply
You must be logged in to post a comment.